
How to Line a Hanging Basket?
- Rap Aparente
- 2 days ago
- 20 min read


To line a hanging basket, pre-moisten the liner in water for 30–60 seconds, press it firmly into the basket frame so it conforms to the sides without gaps, then fill with potting mix and plant. That sequence matters. A dry liner repels water on first watering, and a liner with gaps loses soil immediately. Everything else in this guide is built on those three fundamentals. This guide covers every liner type with honest pros and cons, the side planting technique that no beginner article explains, plant density by basket size, what to put at the base of the basket (and what not to), potting mix formulation for hanging baskets specifically, and how to keep the basket performing across the full season.
Why the Liner Is the Most Important Component of a Hanging Basket?
This guide specifically addresses wire or open-frame hanging baskets, which require a liner to hold soil and manage moisture. Solid plastic hanging baskets, such as the Pro Gro Basic and Pro Gro Planter from Austram's production range, include built-in drainage and do not require a separate liner. If you are working with a solid plastic basket, skip to the potting mix and planting sections.
A wire hanging basket without a liner is structurally useless. Soil falls through the gaps, water drains immediately, and roots have no growing medium to anchor in. The liner is the foundation that makes the basket a viable growing environment. But its function goes well beyond simply holding soil in place.
The liner controls the entire moisture environment of the basket. A breathable liner, like coco fiber, allows air to circulate the root zone while retaining enough moisture to reduce watering frequency. A plastic liner holds maximum moisture but eliminates root airflow. The choice of liner determines how often you water, how healthy the roots are, and how long the basket performs before needing intervention.
Hanging baskets are the most demanding container growing environment that most gardeners encounter. They lose moisture from all sides, not just through the drainage hole, because air moves around the entire basket. Wind, direct sun on the basket surface, and the small soil volume all contribute to rapid drying. A well-chosen, correctly installed liner compensates for this by maximizing the moisture-retention capacity of the limited soil volume available.
Liner Types: Honest Comparison
Every liner type has a legitimate use case. The mistake is choosing based on habit or convenience rather than matching the liner to the plant, climate, and display purpose.
Liner Type | Drainage | Moisture Retention | Breathability | Lifespan | Best For |
Coco Fiber — ProGro Premium | Excellent | Balanced | Excellent | 2 full seasons | Most plants, most climates, retail displays |
Coco Fiber — Fiber Lite | Excellent | Balanced | Good | ~1 season | Production growers, cost-efficient programs |
Sphagnum Moss | Moderate | Very High | Moderate | ~1 season | Cool, humid climates; decorative displays |
Plastic (with drainage holes) | Poor | Very High | None | Multi-season | Hot, arid climates; plants needing max moisture |
Felt / Jute | Good | Moderate | Good | 1–2 seasons | Shaded positions; eco-conscious gardeners |
Burlap | Good | Low-medium | Good | 1 season | Emergency substitute; biodegradable option |
Coco Fiber Liners: Why They Are the Default Choice?

Coco fiber (coconut coir) is the standard for a reason. It holds up to eight times its own weight in water, releasing it gradually to plant roots rather than allowing it to drain in a single watering cycle. It has a near-neutral pH of 6.0–6.7 that suits most flowering and foliage plants without amendment. It is naturally sterile; it does not harbor or transmit soil-borne pathogens. And it is fully biodegradable.
Austram has been sourcing coconut coir directly from the Philippines since 1981, when the company introduced coco moss to the United States market. That depth of sourcing experience informs the ProGro line, Austram's professional-grade coco fiber liner used by retail garden centers and commercial growing programs across the country.
ProGro Fiber Lite vs. ProGro Premium: Choosing the Right Tier
Austram produces two tiers of coco liner, and the distinction matters for performance:
ProGro Fiber Lite: Thinner construction, contains a latex binder, approximately one-year lifespan. More economical, available in larger case quantities. The right choice for production growers who prioritize cost efficiency.
ProGro Premium: Thicker coir, no glue or additives, approximately two-year lifespan, double that of most standard liners. Densely woven construction prevents the "bird's nest effect" that develops when binders degrade, and fibers clump into uneven pockets. The right choice for retail displays, commercial installations, and any setting where liner replacement is disruptive.
Moss Liners
Sphagnum moss holds more total moisture than coco fiber, making it well-suited for cool, humid climates where rapid drying is not the primary concern. It has a softer, more natural appearance that suits formal garden displays and traditional British-style hanging baskets. The limitations: moss dries unevenly (saturated center, dry edges), compacts with repeated watering, and breaks down within a single season. Unlike coconut fiber, moss does not remain structurally consistent through the growing period.
Important: plastic liners should not be used inside moss baskets if you plan to side-plant. The plastic prevents the moss from making contact with roots, which eliminates one of the key benefits of the side planting technique. If moisture retention is the goal in a moss basket, use water-retaining granules mixed into the potting mix rather than a plastic barrier.
Plastic Liners
Plastic liners hold maximum moisture because they prevent evaporation through the basket walls. In extremely hot, arid, or high-wind locations where baskets dry within hours, plastic can extend the time between waterings significantly. The trade-off: no root airflow, which increases fungal disease risk in humid conditions. Always cut multiple small drainage holes in any plastic liner. Unperforated plastic creates a waterlogged anaerobic zone at the basket base that kills roots.
How to Line a Hanging Basket: Step by Step

Follow these steps in order. Each step has a reason; skipping any of them produces a predictable problem.
Step 1: Choose the right liner size. The liner diameter should match the basket's interior dimensions. Measure the basket's internal diameter and depth before buying. A liner that is too small creates gaps at the sides; one that is much too large bunches and folds, creating uneven soil pockets. For preformed liners, the basket size is usually printed on the liner packaging. For flat/roll liners, size up slightly; a small overlap at the rim is preferable to a gap.
Step 2: Pre-moisten the liner. Dry coconut fiber initially repels water. A dry liner, installed and then watered, will shed the first several waterings rather than absorb them evenly. The soaking time depends on the liner type:
Preformed liners: submerge in water for 30–60 seconds. They are already shaped and just need moistening before installation.
Flat or roll liners: soak in a bucket of water for 30–60 minutes. This fully softens the fibers, making the liner pliable enough to conform to the basket shape without cracking or resisting. A flat liner installed without soaking will not conform properly and create gaps at the sides and base.
Step 3: Press the liner firmly into the frame. Place the liner inside the basket frame and press it against the sides, working from the base upward. The liner should conform to the shape of the wire frame without visible gaps between the liner and the wire. Pay particular attention to the base gaps here cause soil loss immediately occurs on first watering. If using a flat liner, tuck and fold the material at the base rather than cutting, which maintains structural integrity.
Step 4: Leave half an inch of liner above the rim. When the liner is seated, it should extend approximately half an inch (1–1.5 cm) above the top rim of the basket frame. This small lip acts as an edge that retains water during watering rather than allowing it to run off immediately over the sides. Trim any excess beyond this, but do not trim flush with the rim.
Step 5: Prepare the potting mix. Use a quality container potting mix formulated for hanging baskets or outdoor containers, not garden soil, which compacts and drains poorly in enclosed spaces. Before filling, mix in slow-release fertilizer granules at the rate specified on the packet, and optionally mix in water-retaining granules (see Potting Mix section for guidance). This step determines the basket's nutritional performance for the entire growing season.
Step 6: Decide whether to side-plant (see next section). If you plan to install side plants through the basket walls, do this before filling with soil to the top. Fill only to the level of the lowest row of side planting holes, install those plants, continue filling, install the next row, and so on. If planting only from the top, skip to Step 8.
Step 7: Fill with potting mix and firm gently. Add potting mix gradually, pressing it gently around the liner walls to eliminate air pockets. Do not compact heavily; roots need air space in the soil. Fill to within 1–2 inches of the rim to allow watering without overflow.
Step 8: Plant the top of the basket. Arrange the top plants before planting. Position trailing plants at the edges where they will cascade over the sides, and place upright or mounding plants in the center. Once the arrangement is set, plant and water thoroughly until water runs from the base of the liner.
The Side Planting Technique: Creating a Full 360° Display
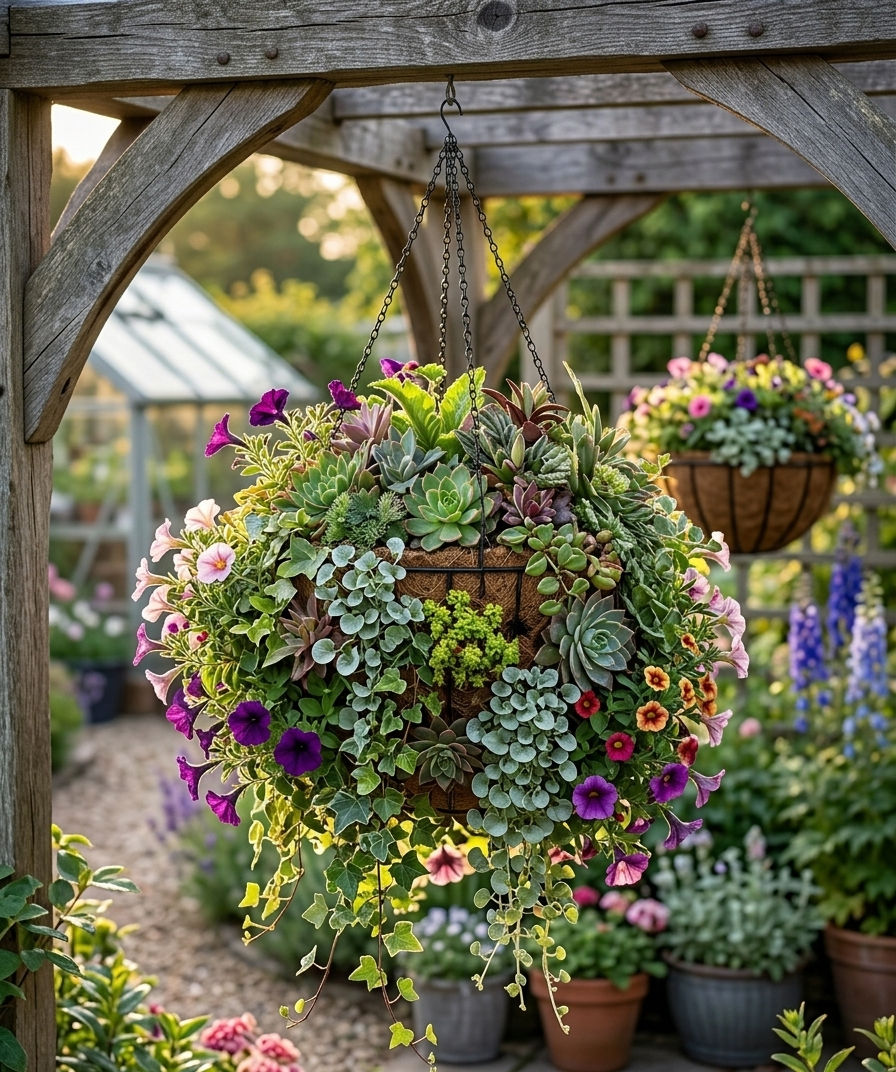
Side planting is what separates a standard hanging basket from a professional display, and it is the technique most beginner articles completely omit. By installing plants through slits in the liner walls, you create a basket that blooms from all sides, including the sides and base that are visible from below. A well-executed side-planted basket looks like a sphere of flowers rather than a pot with plants growing from the top.
Not all liner types support side planting equally. Coco fiber liners are the most suitable material that holds their shape around the planted slits without collapsing. Moss liners work well for side planting because the loose moss molds around plant stems easily. Plastic liners can be cut for side planting, but the holes need to be reinforced to prevent tearing. Felt liners are more difficult to side-plant without the holes opening excessively.
How to Side-Plant a Coco-Lined Basket
1. Mark slit positions before cutting. Space them evenly around the basket circumference, typically 3–4 slits per row at each height level. For a 14-inch basket, a single row of side plants at the halfway point is sufficient. For a 16-inch or larger basket, two rows can be used, one at the one-third height and one at the two-thirds height.
2. Cut 2-inch (5cm) slits using sharp scissors or a craft knife. Cut in a cross pattern (+) rather than a straight line. This creates a small opening that holds the plant stem without the slit tearing further under soil pressure.
3. Fill the basket with potting mix to the level of the lowest row of slits. Firm gently.
4. Push the root ball of each side plant through the slit from the outside of the basket. The foliage goes through first, then the root ball is manipulated through the opening. Work slowly, the coir material stretches slightly to accommodate the root ball. The root ball sits inside the basket in contact with the potting mix; the foliage hangs outside.
5. Add more potting mix around the newly installed root balls, pressing gently to eliminate air pockets. Continue filling to the next row of slits if using two rows, and repeat the process.
6. Fill to within 1–2 inches of the rim and install the top plants as described in the main step-by-step guide.
Use plants in 3–4 inch pots for side plantings, small enough to push through the slits without excessive root disturbance |
Choose compact trailing varieties for the sides: lobelia, bacopa, trailing verbena, mini petunias |
Do not overcrowd the slits; each plant needs enough root contact with the potting mix to establish properly |
Water immediately after installation, the root balls of side plants dry out faster than the top plants until roots establish |
Plant Density by Basket Size: How Many Plants to Use
Overcrowded baskets look impressive on purchase day and deteriorate quickly as plants compete for moisture, nutrients, and light. Underpopulated baskets never achieve the full visual impact hanging baskets are known for. The figures below reflect professional industry practice for both top-only and side-planted displays.
Basket Size | Top Plants (No Side Planting) | Top + Side Plants | Plant Pot Size for Sides |
10–12 inch | 3 plants | 3 top + 3–4 side | 3-inch pots |
14 inch | 4–5 plants | 4 top + 5–6 side | 3–4 inch pots |
16 inch | 5–6 plants | 5 top + 8–10 side (1 row) | 3–4 inch pots |
18–20 inch | 6–7 plants | 6 top + 12–14 side (2 rows) | 3–4 inch pots |
These figures are for plants from 3-4 inch pots. If using larger transplants, reduce the number proportionally. For trailing varieties that spread aggressively (petunias, million bells), use the lower end of the range; they fill in quickly. For more compact or upright varieties (herbs, compact impatiens), the higher end is appropriate.
What to Put at the Bottom of a Hanging Basket

A common practice, putting small stones, gravel, or broken pottery at the base of a hanging basket before adding soil, does not improve drainage. The same physics that make this wrong in plant pots apply here: an abrupt boundary between fine potting mix above and coarser material below creates a perched water table at the boundary, holding the soil just above the gravel layer saturated. In a hanging basket, where the soil volume is already limited, this saturated zone takes up a disproportionate share of the root space.
Hanging baskets with functioning liner drainage do not need a drainage layer. The liner itself is the drainage mechanism. If water is not draining from the base of a properly lined basket, the liner has no gaps there. Check that the liner conforms fully to the basket frame at the bottom.
Nothing except potting mix, the liner, and drainage are the only base layers needed. |
If concerned about soil falling through large holes, place a small piece of coffee filter or landscape fabric over the opening, not stones. |
If concerned about basket weight, use a lightweight, perlite-amended potting mix rather than heavy soil. |
Potting Mix for Hanging Baskets: The Right Formulation

Standard container potting mix works, but hanging baskets benefit from specific amendments that standard mixes lack. Two additions make a measurable difference in basket performance across the season:
Water-Retaining Granules
Water-retaining granules (also called hydrogel crystals) are superabsorbent polymer particles that absorb water during watering and release it slowly to the surrounding soil between waterings. In a hanging basket, where rapid moisture loss is the primary performance challenge, granules can reduce watering frequency by 30–50% in hot weather. Mix granules dry into the potting mix before filling the basket, following the rate on the packet, typically 1-2 teaspoons per litre of potting mix. Do not overapply: granules expand significantly when wet, and overapplication causes soil heaving.
Slow-Release Fertilizer
The limited soil volume in a hanging basket depletes nutrients faster than any other container growing situation. Watering, which is necessarily frequent, leaches nutrients through the drainage holes with each cycle. A slow-release fertilizer granule (Osmocote or equivalent) mixed into the potting mix at planting time releases nutrients gradually over 3–6 months, maintaining nutritional availability throughout the growing season without requiring weekly liquid fertilizing. Apply slow-release fertilizer at the rate specified on the packet, mixed thoroughly into the potting mix before filling. For baskets with heavy-flowering plants like petunias or geraniums, supplement with a liquid feed every two weeks from midsummer onward. Heavy flowering depletes phosphorus faster than slow-release granules alone can maintain.
Water Reservoir for Extreme Heat
For summer baskets in high-heat or high-wind locations, a small water reservoir at the base of the basket extends the moisture-holding capacity between waterings. After the liner is installed, place a small plastic dish or cut a 40cm (16-inch) circle from a plastic bag and lay it flat on top of the liner at the base before adding potting mix. Poke multiple small drainage holes around the lower edge of the plastic so the reservoir releases water slowly rather than creating a waterlogged base. The reservoir collects water during watering and releases it gradually back into the soil as the upper layers dry out.
Water sitting in a base reservoir during frost conditions can freeze and damage plant roots. |
The reservoir technique is for summer use only in warm climates or during the hot growing season. |
Remove or do not install the reservoir when transitioning baskets to autumn and winter planting. |
Recommended Mix for Most Hanging Baskets
Start with a quality container potting mix and amend before filling:
Standard flowering baskets: Base potting mix + slow-release granules at label rate + water-retaining granules at 1 tsp per litre. This works for petunias, lobelia, bacopa, million bells, impatiens, and fuchsia.
Herb baskets: Base potting mix + slow-release granules only. Skip the water-retaining granules. Herbs like thyme, rosemary, and sage prefer to dry slightly between waterings. The granules maintain too much moisture for Mediterranean herbs.
Succulent and drought-tolerant arrangements: Base potting mix + 20–30% perlite. No water-retaining granules. These plants prefer sharp drainage, and the granules counteract that entirely.
Watering and Seasonal Maintenance

A correctly lined and potted hanging basket still needs consistent attention across the season. The single most common cause of hanging basket failure is irregular watering periods of drought alternating with heavy watering create root stress that weakens plants, reduces flowering, and shortens the display season.
How to Water a Hanging Basket Correctly
Water until you see runoff from the base of the liner. A shallow watering that only wets the top 2 inches of soil does not reach the root mass. Water thoroughly until it drains. This is the only reliable indicator that the entire soil volume has been moistened. Check moisture before watering, not on a fixed schedule. Push a finger 1–2 inches into the potting mix. If dry at that depth, water. If still moist, wait. Fixed watering schedules produce both overwatering and underwatering depending on weather conditions.
In hot weather, baskets may need watering daily or twice daily. A 12-inch basket in full sun at 85°F can exhaust its moisture in less than 24 hours. This is normal; it is a function of soil volume and evaporation rate, not a sign that something is wrong.
Water at the base, not from above. Watering from directly above wets the foliage rather than the root zone, promotes fungal leaf diseases, and is less efficient than directing water into the soil. Use a watering wand or position the watering can to direct the flow into the soil surface.
Deadheading and Feeding
Remove spent flowers regularly from trailing annuals, petunias, lobelia, million bells, and bacopa. Deadheading diverts energy from seed production back into new flower bud formation. Without it, flowering slows progressively through the season. For petunias specifically, cutting back aggressively (by one-third) at midsummer, even sacrificing some flowers temporarily, stimulates a second flush of growth that extends the display into autumn.
If slow-release fertilizer was mixed in at planting, supplement with a liquid feed every two weeks from July onward, when flowering demand is at its peak. Use a fertilizer with higher phosphorus and potassium relative to nitrogen during the flowering period. High nitrogen promotes leafy growth at the expense of flower production.
Rescue Technique for Completely Dried-Out Baskets
When a hanging basket dries out completely, the potting mix can become hydrophobic, which repels water rather than absorbing it, so subsequent waterings run straight through the base without reaching the roots. This is a recognizable failure mode: you water the basket, and water immediately pours from the bottom, the soil never saturating. Do not keep watering repeatedly; you are wasting water while the roots stay dry.
The recovery technique: submerge the entire basket in a bucket of water deep enough to cover the soil surface. Leave it for 20–30 minutes. Capillary action draws water back into the dried medium from below, fully rehydrating the root zone in a way that top watering alone cannot achieve for severely dried-out soil. When bubbles stop rising from the soil surface, the medium is fully rehydrated. Lift the basket, allow excess to drain, and resume normal watering practice.
Grouping Baskets to Reduce Moisture Loss
Hanging baskets clustered close to each other create a more humid microclimate around the foliage, which slows surface evaporation from both the leaves and the potting mix. Each basket transpires moisture into the immediate surrounding air. Baskets grouped keep that humidity concentrated around the group rather than dispersed into the open air. This simple positioning technique meaningfully reduces watering frequency during the most demanding summer periods, with no cost and no additional products required.
For wind-exposed locations, grouping baskets in a sheltered corner or against a wall also reduces the mechanical moisture loss driven by air movement across the basket surface. Wind is one of the primary drivers of hanging basket dehydration, continuously moving the humid boundary layer of air away from the soil and increasing the evaporation rate. A sheltered position with grouped baskets addresses both factors simultaneously.
Rotation for Even Growth
Hanging baskets that receive light from one direction against a wall, under an overhang, develop unevenly, with the sun-facing side growing more vigorously than the shaded side. Rotating the basket 180° weekly equalizes light exposure and produces more symmetrical growth. This is particularly important for side-planted baskets where the goal is a full, rounded display from all angles.
Common Mistakes When Lining a Hanging Basket

Skipping Pre-Moistening the Liner
Installing a dry liner and then trying to water it in place results in the first several waterings running through the liner rather than being absorbed by it. The soil never fully saturates, plants dry out faster than expected, and the liner never fully conforms to the basket shape. Thirty seconds of soaking before installation prevents all of this.
Leaving Gaps at the Base of the Liner
The base of the liner is the most important area for soil retention and the most commonly neglected during installation. Any gap between the liner and the basket wire at the base allows potting mix to fall through immediately on first watering. Press the liner firmly against all wire contact points at the base before adding any soil.
Using Garden Soil Instead of Potting Mix
Garden soil compacts rapidly in the enclosed, small volume of a hanging basket, blocking air movement around roots and causing drainage to fail regardless of liner quality. Use a purpose-formulated container or hanging basket potting mix.
Trimming the Liner Flush with the Rim
A liner trimmed exactly level with the basket rim provides no retention barrier for water during watering. Leaving half an inch above the rim creates a small edge that holds water while it soaks in rather than immediately running off over the sides. This single adjustment meaningfully improves water retention efficiency per watering session.
Putting Stones or Gravel at the Base
Covered in detail in the previous section, this raises the perched water table and makes waterlogging more likely. The liner and drainage holes are the drainage mechanism. Nothing else is needed at the base.
Overcrowding Plants
A basket packed with double the recommended plant count looks impressive on Day 1 and deteriorates into a competition for resources within weeks. Crowded roots cannot absorb water efficiently from the limited soil volume, and crowded foliage creates humid microclimate conditions that promote fungal disease. Use the plant density guide above and resist the temptation to add extra plants.
When and How to Replace a Worn Liner
Even high-quality liners eventually reach the end of their usable life. Knowing when to replace rather than re-use prevents a mid-season failure that requires replanting an established basket.

Replace if: The liner shows visible thinning at the base or sides, holes have developed beyond the original slits, or the fiber structure has become so loose that soil is falling through the walls during normal watering.
Inspect before reuse: At the end of each growing season, remove the liner, clean off spent soil, and let it dry completely. ProGro Premium liners that have retained their density and shape can be stored for a second season. Fiber Lite liners showing any structural softening should be composted and replaced.
Rehydrate stored liners: A liner stored dry for months will be stiff and less pliable than a new one. Soak it for 30–60 minutes before reinstalling the same pre-moistening step used for new liners. This restores flexibility and improves conforming to the basket shape.
Compost spent liners: ProGro Premium liners contain no synthetic additives and biodegrade cleanly. Spent liners can be composted directly or broken up and worked into garden beds, where they contribute organic matter as they break down.
Alternative Liners When Standard Options Aren't Available

Purpose-made coco fiber liners are the strongest performer for most applications. When they are unavailable, some alternatives are functional, and some are not worth the effort.
Burlap (hessian): The best readily available alternative. It is breathable, holds soil securely, and biodegrades naturally at the end of the season. Available at fabric stores and garden centers. Effective for a single season.
Jute fabric: Similar to burlap, breathable, biodegradable, and functional. Slightly finer weave than burlap, which reduces soil fallout through the material.
Old hessian sacks: Cut to size and used as a liner, these work for one season. The material breathes, holds soil, and degrades naturally. Wash before use if the sack previously contained anything that could leave residue.
Newspaper: Not a practical liner for hanging baskets. Newspaper becomes saturated within the first watering, loses structural integrity immediately, and typically falls apart within a week. The ink in newsprint also has not been validated as safe for root zone contact in edible baskets. Avoid.
Coffee filters: Useful only for covering drainage holes to prevent soil fallout, they are far too small to line a basket. Not a linear alternative.
Frequently Asked Questions
What can I use to line a hanging basket?
Should I line hanging baskets with plastic? Should I line hanging baskets with plastic? The best liner for most hanging baskets is coco fiber. It balances moisture retention, drainage, and root airflow, lasts 1–2 seasons depending on quality tier, and is suitable for most plants and climates. Austram's ProGro Premium coco fiber liners are densely woven with no glue or additives, providing two full growing seasons of performance and preventing the structural breakdown that affects lower-quality liners. Practical alternatives include burlap or jute for single-season use. Newspaper is not a functional liner; it breaks down within a week of first watering. Moss liners are a good choice for cool, humid climates and decorative displays, but require more consistent care than coco fiber.
Should I line hanging baskets with plastic?
Plastic lining is appropriate only in specific conditions: extremely hot or arid climates where baskets dry within hours, for plants with very high moisture requirements, or in high-wind locations where evaporation is accelerated. Outside of these conditions, plastic creates more problems than it solves. It eliminates root airflow, increasing fungal disease risk, and in humid climates, promotes the waterlogging it is supposed to prevent.
If you use plastic, always cut multiple drainage holes across the base and sides before installing it. Unperforated plastic creates an anaerobic zone at the basket base that destroys roots within weeks. Use plastic as an additional inner layer inside a Coco liner, not as a replacement for it.
Do you put holes in hanging basket liners?
For breathable liners like coco fiber, moss, felt, or burlap, no holes are needed. These materials drain naturally through the fiber structure. For plastic liners, yes, holes are essential. Without them, water pools at the base and creates waterlogged conditions that kill roots. Cut holes evenly across the base and lower sides before installing.
If you are cutting slits for side planting in a coco liner, use a cross-cut (+) pattern rather than a straight slit. The cross pattern holds the plant stem without the opening tearing further under soil pressure during the season.
What is the best liner for a hanging basket?
For most plants, most climates, and most displays, coco fiber is the best choice, specifically, a premium-quality coco liner like ProGro Premium that is densely woven with no latex binders or additives. It absorbs up to eight times its own weight in water, has a near-neutral pH that suits most plants, is naturally sterile and antifungal, and lasts two full growing seasons under proper care.
For cool, humid climates and traditional or formal display styles, sphagnum moss is a strong alternative. For gardeners in hot, arid climates who struggle with moisture retention, a coco liner with a thin plastic inner layer (with drainage holes) provides the best of both approaches.
How do you side-plant a hanging basket?
Fill the basket with potting mix to the level of your first row of planting positions. Cut 2-inch cross slits in the liner at evenly spaced intervals around the circumference. Push the root ball of a small plant (3–4 inch pot size) through each slit from the outside, foliage first, until the root ball sits inside the basket in contact with the potting mix. Add more potting mix around the installed root balls, firm gently, and continue to the next row if using two rows.
For a 14-inch basket, one row of 5–6 side plants at the halfway height is appropriate. For 16–18-inch baskets, two rows of side plants produce the most impressive full-sphere display. Choose compact trailing varieties for the sideslobelia, bacopa, trailing verbena, and mini petunias. Avoid large or fast-spreading varieties that will overwhelm the top plants.
How many plants should go in a hanging basket?
For a 10–12 inch basket with no side planting: 3 plants. For a 14-inch basket: 4–5 from the top, plus 5–6 side plants if side planting. For a 16-inch basket: 5–6 from the top, plus 8–10 side plants in one row. These figures are for plants from 3–4 inch pots.
Reduce plant count if using larger transplants, or for aggressive trailing varieties that spread quickly. A correctly planted basket looks sparse on planting day and reaches full coverage within 4–6 weeks under good growing conditions. Resist the urge to overcrowd competition for moisture and nutrients in the limited soil volume, which weakens plants and shortens the display season.
How do you keep a coco liner hanging basket from drying out?
Four approaches work in combination: pre-moisten the liner before installing it (eliminating the initial water-repelling phase of dry coir); mix water-retaining granules into the potting mix before filling (these can reduce watering frequency by 30–50% in hot conditions); mix slow-release fertilizer in at planting (so you are not supplementing nutrient-depleted soil mid-season with repeated liquid fertilizing that also leaches moisture); and leave half an inch of liner above the rim (this small lip retains water during watering rather than allowing it to run off immediately).
In extreme heat, adding a thin plastic inner layer with drainage holes reduces evaporation through the basket walls. This works best inside a Coco outer liner rather than as a standalone plastic liner.
When should you replace a coco liner in a hanging basket?
Replace the liner when it shows visible fiber separation, thinning at the base or sides, or persistent soil loss through the walls during normal watering. At the end of each season, remove the liner, clean off spent soil, and dry it completely before storage. ProGro Premium liners that retain their density and shape can be stored and reused for a second season.
Fiber Lite liners showing any structural softening at the end of the season should be composted rather than stored. Both ProGro liner types are fully biodegradable, compost spent liners directly or work them into garden beds.
Premium tier: thicker coir, no glue or additives, approximately two full growing seasons. |
Fiber Lite tier: economical, larger case quantities, approximately one growing season. |
Available in preformed round and rectangular shapes for standard basket frames. |
Available through Austram's authorized wholesale distribution network nationwide. |


Comments